Have you noticed the recent trend of vertical gardens and living walls? They’re an awesome way to bring life into your home in a pretty unusual way. Just take a look at what David Brenner did for the San Francisco Museum of Art!
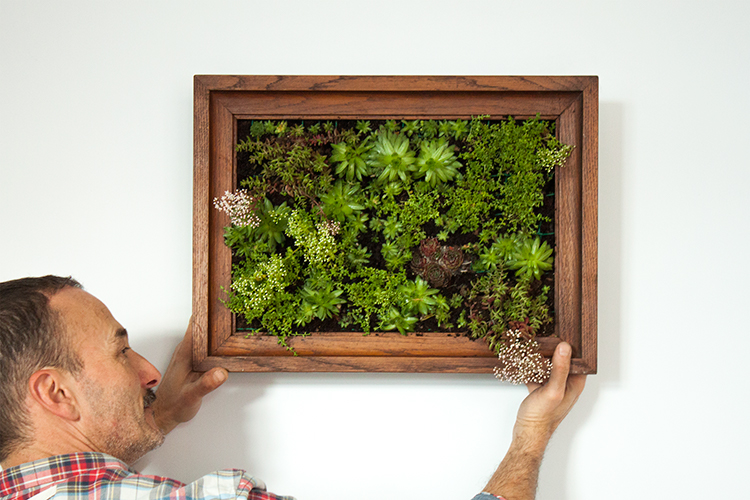
Today, I’m working with the awesome team at MannKraft to bring you a method for making your own (scaled-down) vertical garden display for your home. The MannKraft team came up with a simple-to-make mini succulent garden using a vintage frame that they found at a flea market. This vertical garden works with any frame you like, but bear in mind that thicker frames work best – you could even paint it if you don’t like the colour of the wood.
Okay, over to you guys for the tutorial!

How to make a vertical garden succulent frame
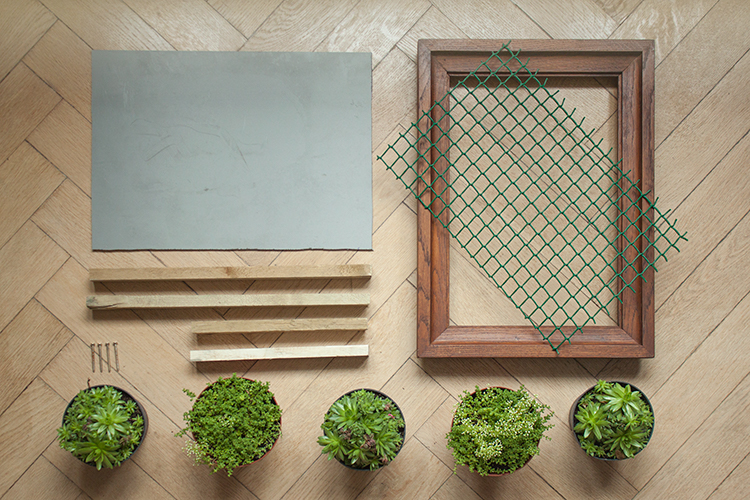
To make your vertical garden, you’ll need:
- Picture frame with back and glass panel removed (a thicker frame works better for this project)
- 4 x pieces of wood (2 cm x 2 cm thick and the same length as the dimensions of the frame) to make the shadow box. Try using hard wood like redwood or cedar, or treating the wood to resist water.
- Hammer
- Nails
- Screws
- Screwdriver
- Wood drill
- Wire mesh (holes roughly 2 cm square) to fit the dimensions of the frame
- Staple gun
- Staples
- Plywood or plastic backing to fit the dimensions of the shadow box
- Paint (optional)
- Cactus/succulent potting soil
- Succulent cuttings
- Hooks or wire for hanging the frame
Tutorial
1. Remove the glass and the back from the frame.
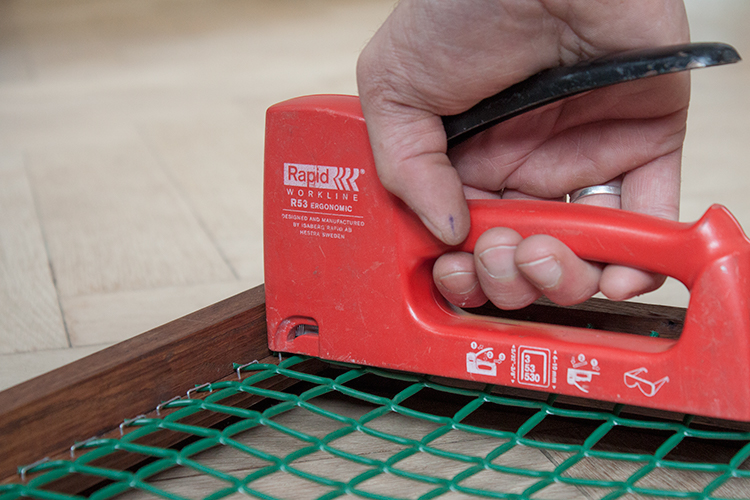
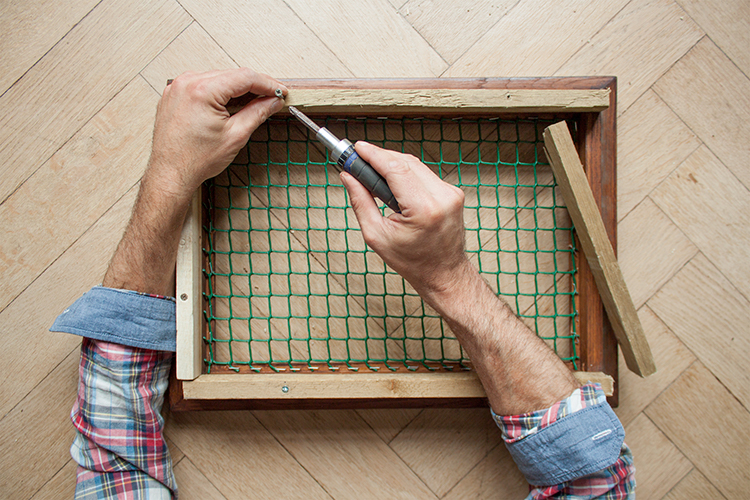
2. Cut the wire mesh to fit inside the frame opening, making sure to leave enough to staple to the inside edges of the opening.
3. With the frame face down, insert the mesh. Staple the mesh to the inside edges of the frame, stretching it as you go to make sure that it is nice and taut.
4. Now time to construct the shadow box on the back of the frame to create space for the soil and plants. Cut the wood to the dimensions of the back of the frame – we had two longer pieces and two shorter pieces to form a rectangle. Use a wood drill to make holes slightly smaller than the nails or screws. Drill all the way down through the wood and into the frame. Nail or screw into place.
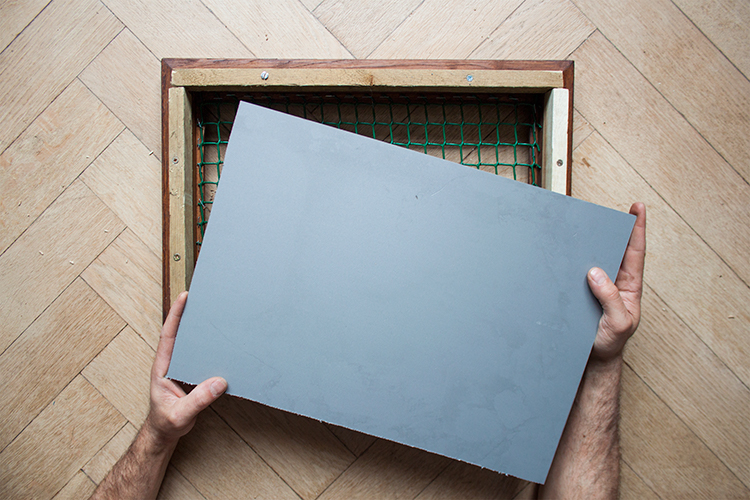
5. Cut the plywood or plastic backing to the size of the shadow box. Place the backing on the back of the shadow box and nail into place.
6. (Optional) – Paint the frame your desired colour (black looks really cool!) and let it dry. You could also stain the wood of the shadow box so that it’s the same colour as the frame.

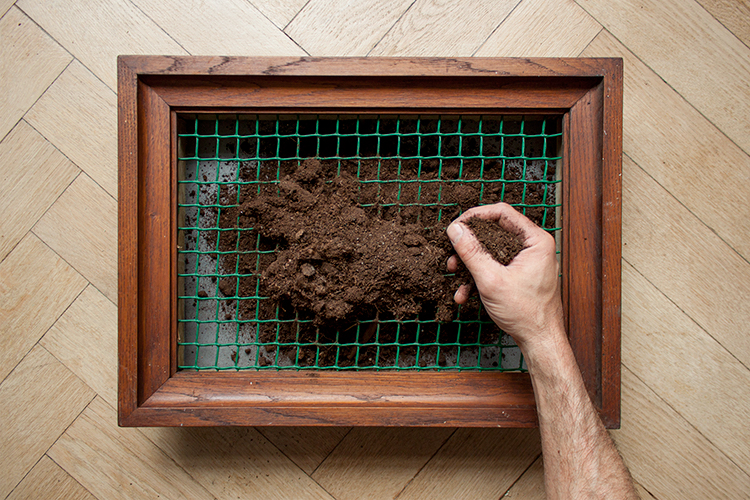
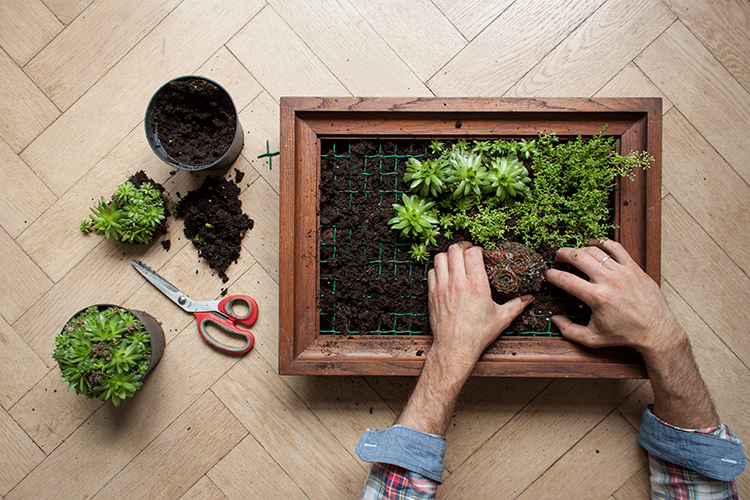
7. With the frame facing up, pour succulent soil on top of the wire mesh, using your hands to push it through the openings. Shake the frame periodically to evenly disperse the soil. Add more soil until it fills the shadow box, reaching the bottom of the wire grid.
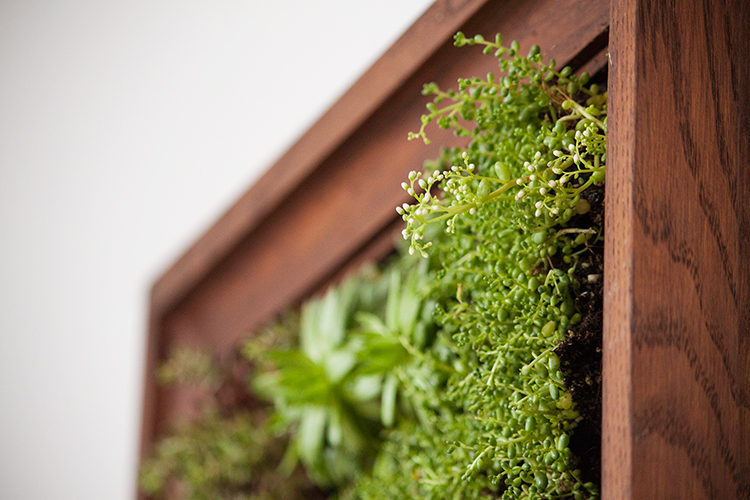
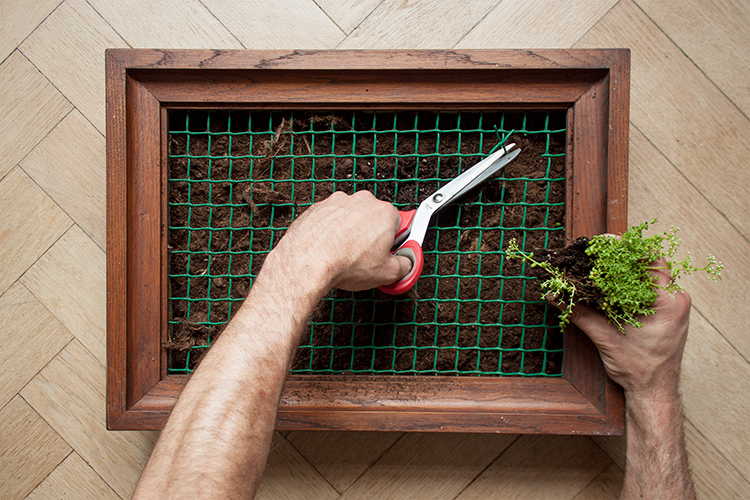
8. Separate the succulents into small clumps and place through the wire mesh to create a design. Tuck in larger plants first, followed by smaller ones. You may need to cut and bend the wire squares so that the bigger plants can fit – be careful not to cut too much, otherwise your wire grid will fall apart! Plant as close together as the grid allows. After planting, you may see hints of the wire, but as the succulents grow, they’ll close the gaps.
9. Attach hooks or wire to the back of the frame, hang it up and admire your handiwork!
This mini vertical garden is a sure-fire way to impress; it looks great! If you fill it with succulents, it can be used to easily decorate any wall space, indoors or outdoors. Best of all, it requires very low maintenance, only needing a sunny spot and monthly watering or regular misting… so it’s perfect for those serial-plant-killers (like me..!).
Until next time! – Mike (and the Mannkraft team).
Don’t forget to pin the image below so you can try it later!


23 Comments
Kathy
September 14, 2021 at 9:27 pmI really like the succulents you used. Do you know the names of all of any of them? I really would love the name of the 2nd one. that you have in the picture where you lined up all. 5.
CHARLENE GARDNER
April 23, 2021 at 7:00 pmI would love to try this, i have a top to a pallet which essentially looks like a picture frame box already so could use this instead and just add the wire to the top and treat the wood before hand? also would the succulents grow ok in the UK on a walk that doesn’t get much direct sunshine or should I use moss instead? I want to use it to make a big house number design…..thoughts?..
Mike
April 28, 2021 at 4:08 pmThat sounds like it should work perfectly! I’m in the UK, and I have plenty of succulents in my home that don’t get much light, so I think you should be okay (although I can’t definitely guarantee it, of course!). – Mike
Jen
April 21, 2021 at 1:32 amHow does the soil not fall out?
Mike
April 28, 2021 at 4:10 pmHi Jen! It gets compacted and held in place under the mesh. Sounds like it shouldn’t work, but it really does! 🙂 – Mike
Ivy Montilla
February 18, 2021 at 6:55 pmwould orchids be good for this project
Mike
February 21, 2021 at 6:11 pmI don’t think so unfortunately – I’d recommend sticking to succulents and moss!
Johanna Jeffel
August 2, 2020 at 6:45 amHow long after you finish can you hang it ? Do you leave roots or cut them out ?
Mike
August 2, 2020 at 10:11 amI’d recommend leaving it for a few hours for the plants/soil to settle, before hanging it up. And there’s no need to cut the roots out, you can plant them as you would in a normal plant pot. Hope this helps! – Mike.
Harold Saunders
October 8, 2019 at 1:15 pmThis is another great project. Thank you for sharing this one.
Catt
October 1, 2019 at 11:44 pmHow does the plant drain after watering??
Mike
October 3, 2019 at 10:23 amI’d recommend spraying it with a fine mist every week, so there’s no need to drain it. 🙂 – Mike.
DIYPD Peter
March 27, 2019 at 7:31 pmLooks stunning! I’ll try to make it this weekend with my wife! Well done!
Mike
March 28, 2019 at 11:05 amThanks so much! Tag me in a photo if you make one – I’d love to see! 🙂 – Mike
Gr
March 27, 2019 at 2:32 pmThank you for a great tutorial! Can I use it to grow herbs?
Mike
March 27, 2019 at 2:45 pmGlad you like it! Hmm, I don’t think herbs would work too well in this – they need a lot of watering and sunlight, and they tend to grow quite a lot. It works best with succulents and similar plants, which don’t grow so much, and don’t need much watering. But there’s nothing stopping you from trying it out! 🙂 – Mike.
Jenni H
February 16, 2019 at 2:23 amI used plexyglass backing and E6000 craft adhesive to cut down on tools I didn’t have and used chicken wire instead of mesh. This is a really versatile project. I have 4 frames of varying sizes all up on p e wall as a focal point piece for a room. It looks amazing. Thank you for the inspiration!
Mike
February 18, 2019 at 6:16 pmOh brilliant! I love that you’ve tweaked it to work with what you’ve got – that’s how crafting should always work! 🙂 Thanks so much for the comment. – Mike
Lyndsay
January 12, 2019 at 3:10 pmCouldn’t you just use a shadow box to start rather than building one?
Mike
January 14, 2019 at 12:18 pmYep, you definitely could! I actually did just that in a similar project recently – https://www.thecraftygentleman.net/2018/08/13/easy-tropical-garden-wall-art-diy/
However, building one yourself will give you full control over the size and shape – so you can customise it to fit your home perfectly! 🙂 – Mike.
TH Stone Landscaping
July 30, 2018 at 5:01 pmWe always love talking about landscapes.
yard care
July 26, 2018 at 6:09 pmTexdture affects the perception of distance and scale.
Merril Moon
May 13, 2018 at 12:29 pmI’ve got plastic bread crates, how would you use that?, what would you use for a backing?