


The weather is slightly warmer than normal, the schools have broken up and everyone’s talking about their upcoming jet setting adventures, which can mean only one thing… the summer holidays are here! I feel like I’ve cheated a bit, because I had my summer holiday a few weeks ago, but hey – the summer is still not over yet!
For those lucky folks who have a summer holiday planned, I have a perfect DIY for you to try out. You might have seen some of these wash and wear travel bags floating around on Pinterest or the blogosphere lately, so I thought I’d make a DIY version in a slightly more unusual design. Basically, it’s a travel bag for your socks and pants – the clean ones go into the “wear” section, then you move them into the “wash” section as you use them! It might seem a bit OTT for underwear organisation, but anyone who travels a lot will appreciate how annoying it is to keep your clean and used socks separate!


DIY wash and wear travel bag
What you’ll need
- 4 squares of fabric, approximately 40 cm x 40 cm
- Two zips, each 5 cm shorter than the width of your fabric
- Cotton thread
- Tape measure
- Optional: Two small pieces of leather
- Optional: Leather stamp kit




What to do
- Cut out four pieces of fabric to even sized squares, approximately 40 cm by 40 cm.
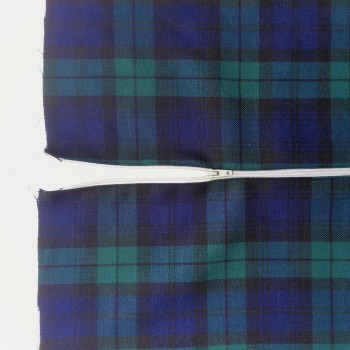
- Take one of the fabric squares and one zip. Fold over one edge of the fabric square by 1 cm, iron it flat, then pin it to the fabric part of the zip. Make sure that the right face of the fabric is on the right face of the zip! Stitch it in place, removing the pins as you go.
- Repeat step 2 with another fabric square, this time attaching it to the other side of the same zip. You should now have two squares of fabric stitched onto one zip.
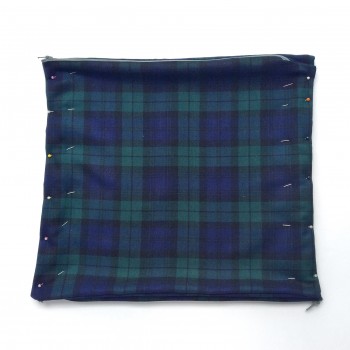
- Fold these two fabric squares in on themselves, face-to-face, so the zip sits on the fold between them (the zipper handle should be facing inwards). Sew around all of the other three edges of the fabric square, approximately 1 cm from the raw edge.
- You should now have a simple pouch made from two fabric squares and joined at one side by a zip. The pouch will be inside out, so undo the zip and turn it the right way out.
- Repeat steps 1-5 with the other two fabric squares and the other zip, so you have two identical zipped pouches.
- Close the zips on each pouch, then place the two pouches on top of each other. Make sure that the zipped edges are on opposite sides and all other edges line up neatly. Pin in place, then stitch down the two sides that do not have zips on, approximately 0.5 cm from the edge. You should be sewing through four layers of fabric (two from each pouch).
- You will now have a tube shaped gap through the two pouches. Turn this pouch in on itself, so the edges you sewed in step 7 are neatly hidden inside the tube.
- Choose one of the zipped edges. Position the bag so that the zip you have chosen is on top of the other pouch. Open the zip, then sew the bottom three layers of fabric together (so you will sew the two layers of fabric in the bottom pouch together with one layer from the top pouch). Make sure not to sew the zipped side shut!
- Repeat step 9 with the other zipped side.
- OPTIONAL: Cut out two small pieces of leather and stamp the words “wash” and “wear” onto them. Stitch these to each zipped side of the bag so you can identify which side is for clean clothes and which is for dirty.
I love the optical illusion of this DIY: it seems like both zips lead into the same central pocket, to form a tube – but they actually are completely separate compartments. No more hunting through your suitcase to find a fresh pair of socks! Try making one of these wash and wearDIY travel bags for your summer holidays, you’ll be surprised at how useful they are.





7 Comments
Kitty K
October 2, 2026 at 10:43 pmThis would also be great at the gym in the old duffel bag to keep things separated.
Dawn Scheier
March 3, 2021 at 7:09 pmTotal Genius! Am on the way to the fabric store, for a birthday gift . Am planning on camouflaged type fabric. Am also planning on the men’s roll up toiletry bag as well, and a matching bag for shoes. Men’s gift ideas are so underserved, so I am so glad I found your website! I’ll be back for more. Thank you for all the effort you put into, to quit your dayjob, for this amazing inspiration point for burgeoning crafters like myself. Bravo!
Mike
March 14, 2021 at 9:38 amThank you so much Dawn, I really appreciate that! 🙂 Hope you have fun making this project! – Mike.
Tara
July 30, 2018 at 4:26 amI love the way this bag looks… but I don’t quite follow the finishing steps. Any advice?
Mike
August 2, 2018 at 12:29 amSo glad you like the bag, thank you! Which part in particular are you stuck with? I’ll try to help as best I can. 🙂 – Mike
Hope
May 23, 2018 at 11:09 pmI love this and will make one tonight!
Mike
May 24, 2018 at 10:53 amThanks, glad you like it! 🙂 – Mike